Friday, April 3, 2009

Spring 2009

As I went through my typical search of the area stores for Spring/Easter, I found little that was different that I was impressed with that I didn’t already have. However I did find the item below at Hobby Lobby that was 40% off, which put the cost at just under $9. Several months ago I had purchased small lucite(I think) Scotties off of ebay in pink or lavender plaid, and knew that I could probably score something to put them on the closer it got to Easter-and this Welcome Spring decoration ended up being just the right colors.


This shot shows the general width that lends so much sturdiness to this item. I wondered if perhaps it was possibly meant to be a door topper as I can see where if you have an older home with the wide oak or walnut molding, or a new home with thick wide molding around the doors, it probably could be used that way. In the end I would have to try the Scottie-decorated item up over the doorway to see if the little Scottie decorations would still show up before I would use it that way. They are so small and charming you wouldn’t want them to be indistinguishable because they are up too high.


What I liked about this decoration is that it was wide enough at the base of the initial W, the middle S, and the final G , that I could mount 3 scotties giving the base balance and contrasting color.


Then I had to tackle how to create the effect of random movement in these little stationary items, and also give thought to maintaining balance across the top, keeping in mind that these hard, clear, lucite Scotties are absolutely not pliable and all need maximum wood surface of the letters to stick on in order to be supported. I used two surfaces or letters whenever I could—one for the feet to stick to and the other to mount the butt against. I experimented with many placements of the Scotties until I was happy


The picture below is the paint-on adhesive that was my choice for bonding these scotties. When it dries it has the consistency of that gel that they are currently using to send samples through the mail that are meant to be picked off the paper and used-only this glue is stickier and thinner. The last thing in the mail I got that used this was either a saturated cloth of a new furniture polish they came out with, or a new fabric softener sheet. I would always pick off the sample AND the gel piece that I then rolled in a ball, stored, and told myself that someday it would mount something and I would be glad I saved it. But somehow they tend to dry up and not stay sticky so I haven’t used one yet-but just having them in the house gave me the idea that if I painted the bottom of the feet (and sometimes the butts) of the Scotties multiple times (letting each coat dry in between), maybe I could build up a clear gel-like coat that would act like those I’ve been stockpiling. I was lucky in that it did exactly what I wanted. My thought was that I might even take these Scotties off this spring decoration and use them on something else because the glue claims that if you allow the glue to fully dry before you mount your item, it truly does let you lift and stick the item again. I can verify that this works-and the converse it true—if you forget to let it dry, you are not separating either of your surfaces forever. I would have to see however if pulling these off will tend to take up pieces of the paint underneath- if it does I’m going to reinforce the Scotties permanently along the top of the letters with Aleene’s regular glue at the junction on their backside where they join to the wood. You want to be able to store this after you’re done with it and get it out next year without the Scotties falling off.

P.S. ( Anybody who wants jars of little balled up gel pieces from mailed samplers should show up at my husband’s garage sale after I die-he will have no clue what these are and will tell people I must have been suffering Alzheimer’s before I passed and left him with all my clutter. He also will give away very valuable crafts supplies without the slightest clue. (If you email me now, I can put you on my contact list labeled “The End Has Come” and if he can remember how to use the computer to send something out, you’ll know when the sale will be)


This is the finished item. I can work this into my décor now and keep it up as I now go scouting for true Easter items to embellish.


Once this is was made up it lent itself to all kinds of creative combinations.


Sunday, February 15, 2009

After Valentine's Day 2009

Now that Valentine's Day is over, it is prime time to scoop the after-holiday bargains that can be used to make very nice quality scottie items to sell in future bazaars, or just to keep. This heart shaped box with beautiful graphics sold for only $2.00 at T.J.Maxx several years back-about 2 weeks after Valentine's Day had passed. I bought 4, and in the picture that you are viewing is a top, bottom, and inside. I especially liked the clear see through window of plastic on the top. (So before you ditch any candy boxes, stationery boxes, heavy gauge perfume/soap/ or condiment boxes that are attractive and sturdy , give them a good once over to see if there are decorating possibilities if you add a touch of scottie.)


I flipped the top over, and glued a decorative lace doily on the inside of the clear window, anchoring the lace at the very edges so that no glue showed when the item was right side up.


Here is a collection of the doilies I find in my travels-usually in sellout clearance sections from places like Hobby Lobby(where most of these are from), Michael's, Joann's, Big Lots, etc. Rummage sales and antique stores also will sometimes bundle these for a low price.


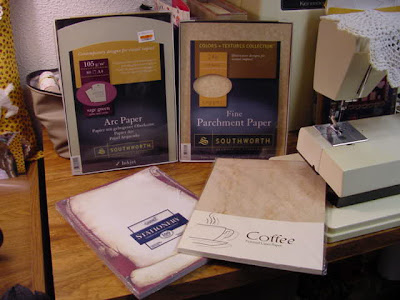
Next I decided on my focal point. In this case I either downloaded this picture off of an ebay item that was being sold, or used a greeting card. When I download off the internet, I copy onto colored parchment. Places like Office Max carry heavy stock colored parchment and this color is either a coffee shade or ecru-it gives the picture an antique hue. I carefully tore the card in a assymetrical predetermined shape, then lightly deckled the edge with a gold metallic acrylic paint applied with a fine paint brush.


Here are examples of the parchment colors that make a normal copied picture look
instantly antiqued.


Since the box is of a Victorian design, I then asked a friend to lend her expert touch (Thank you Lisa) because she has a knack for how to add the buttons, lace, ribbon, and baby's breath that are the accents. As you can see, she went into her button box and laid small off-white buttons of differing sizes around the perimeter of the window. Then she added fillers of Victorian design-bows, lace, a butterfly, a sprig of baby's breath, a heart-and other filigree decor glue-ons (findings) that you can gather or buy in premixed bags at places like Michael's if you don't have them lying around. Since we all don't have a 'Lisa" in our life, I would suggest that you go to the library into the handicraft section(located around the knitting books) and there are always a few books on Victorian crafts-you'll have more ideas to copy than you'll ever need-and you will very quickly get the feeling for what Victorian includes. If you have a button that you want to glue down but the shank interfers, cut off the shank with a shank snipper-or wire cutters-sand flat, and glue it down. Pictured below is a picture of the shank snippers that most good fabric stores carry-usually close to their quilting section. I use this alot for stuff the wire cutters can't get close enough to because they are curved.


The nice thing about this particular box was that the decos gave the impression of being glued
right down on the lace, however are glued on top of the plastic see-through part of the lid. This gives the box a depth I hadn't anticipated.


Here is a full shot of the finished product. Not just for Valentine's Day, it could be used for a touch of scottie anywhere in the house.


Here are some containers I have stashed that came with other products in them that are covered with dust and are begging to be scottified. The plaid is a wine carrier, the gold had shortbread cookies, and the wooden had soaps.

Tuesday, February 3, 2009

Valentine's Day 2009

Here is a quick project to have a touch of Scottie around Valentine’s Day.

These two bags were purchased at a local Marshall’s. I believe they were $4.99 each-made of felt, and can be eye catchers if holding wrapped candy hearts, red and white silk carnations, or whatever else that you might like to display. The smaller bag’s seam at the top was a bit wide and didn’t want to lay flat-so I topstitched it again and trimmed off the excess material. Other people probably would not have noticed it-but I’m fussy and wanted it to have a good start. Other bags from other places would also be fine. I have had good luck finding these at Big Lots, TJs, and Hobby Lobby. Just be sure they are made of a sturdy enough material that will let you glue something onto it and are of a composition that doesn’t run or react with the glue to create a bleed or stain around your charm.


Now that you have your bags or containers, you need to find the right size and color of the scottie you want to apply that will be of the right scale, can be glued down, and blends well with the colors you are working with. I had purchased these Scottie pony tail holders awhile back from a vendor on ebay and they gave me the look I wanted. They are made of plastic, which I was sure would bond to the felt. A plus was that they were right and left facing which meant I could use this option on the bag. I have seen Scottie ponies at Claire’s Boutique, the Dollar Store, Gymboree, and on ebay also.


I carefully pulled the pony back away from the plastic, afterward using an exacto knife to scrape debris-you want it to bond well and it won’t if it isn’t flat.

These iron-on appliqués from Walmart ended up being exactly the right size for the smaller bag, I put one on each side of this bag—could have also probably worked in the hearts- but after I got the dogs on I decided it was enough.


I also happened to have in my craft room a bag of multicolored cracker jack Scottie charms purchased awhile ago on ebay. They are still being sold. They were a good size to be used on the long bag, are cheap, also can be made to face right or left, and actually could have also marched across the smaller bag and looked cute. These take some prep work-but aren’t time intensive. The white Scottie needs to have it’s charm top snipped flush with the body-then have any rough edges gently sanded flat. What I would then do, if I had used these, is to have taken another color—they came in a blue that I didn’t care for-and I would have snipped the charm tops off, sanded them down, and put several coats of black paint on them. Black and white scotties could have gone on the long bag, and black could have been placed on the smaller bag.


In order to cut/sand the plastic Scottie charms if you go this route, you will need some tools. I raided my husband’s tool box for these wire cutters. He never missed them. The files came from a Discount Tool outlet. Sandpaper, a heavy nail file, sturdy scissors-these are all the things I probably used in the days before I decided to bulk up my craft tools and keep them on hand for the many things I do.


These paints are my favorites for painting black Scotties and seem to go on everything from plastic to wood to metal. The Rustoleum SemiGloss is best on anything that will spend time outdoors—it is not a water cleanup. The Indoor/Outdoor Gloss pictured is an Acrylic Enamel that cleans up in water. It takes only 2 coats of this to paint these Cracker Jack Scotties, doesn’t seem to flake off, goes a long way, and is found at Walmart, or Michael’s. Best of all, it is cheap.


These are my tried and true favorites from Aleene. They dry clear. I use them on everything but metal. I used a paint brush to coat the back of the ponytail dogs, and also glued, rather than ironed-on the the appliques from Walmart to the smaller bag.


This helps to see the placement and scale of the Scotties on the long bag.


This picture shows my placement of the Scottie appliqué. It is not hard to envision how cute a row of the black painted Cracker Jack charm Scotties would have looked marching above the red scalloped edge. If someone makes this up, be sure to email me a picture.


Here are the two finished bags. Not expensive or hard to create. And nobody else has them. This gives you a basic framework of how to use what is out there and make it better with a touch of Scottie. Let your imagination run free. If you don’t get all your supplies rounded up in time for THIS Valentine’s Day, buy the bags (or whatever you decide to use) at 75% off after Valentine’s Day and make something up to keep for next year. No one becomes a crafter overnight because until you get the hang of where to go for supplies, you spend a lot of time looking. But that’s what makes it fun. Ask me questions-I’ll help if I can. And be sure after this first posting to let me know what has been confusing. I’m planning on getting started on St. Pat’s very soon so that anyone who may try their hand at this, and decides to really get into it -as I have- will have more lead time before THAT holiday.
Have fun.